Insider Tip: Batch Watermarking Images with a Photoshop Action
As an influencer, your visual content is your currency. Protecting it from unauthorized use and ensuring consistent branding is crucial. That’s where Photoshop’s batch watermark action comes in. This powerful tool allows you to efficiently add watermarks to multiple images simultaneously, saving you time and maintaining brand consistency.
Why Batch Watermarking is Essential for Influencers
- Content Protection: Prevents unauthorized use and distribution of your images, safeguarding your intellectual property.
- Brand Consistency: Ensures all your images feature your watermark, reinforcing your brand identity across platforms.
- Time Efficiency: Automates the watermarking process, saving you valuable time and effort.
- Professionalism: Adds a polished and professional touch to your images, enhancing your brand’s credibility.
- Marketing & Attribution: Helps drive traffic back to your channels by including your logo or website URL in your watermark.
Creating a Batch Watermark Action in Photoshop
Prepare Your Watermark:
- Create a transparent PNG file of your logo, signature, or desired watermark.
- Ensure the watermark is appropriately sized and positioned for your images.
Open an Image:
- Open any image in Photoshop.
Start Recording an Action:
- Go to “Window” > “Actions” to open the Actions panel.
- Click the “Create new action” button (the folder icon) at the bottom of the Actions panel.
- Name your action (e.g., “Batch Watermark”).
- Click “Record.”
Place Your Watermark:
- Go to “File” > “Place Embedded” or “Place Linked” and select your watermark PNG file.
- Position and resize the watermark as desired.
- Adjust the opacity of the watermark to your preference.
Save Your Image:
- Go to “File” > “Save As” and choose your desired file format (e.g., JPEG, PNG).
- Select a destination folder for your watermarked images.
Stop Recording the Action:
- Click the “Stop playing/recording” button (the square icon) at the bottom of the Actions panel.
Using Your Watermark Action
Batch Process Images:
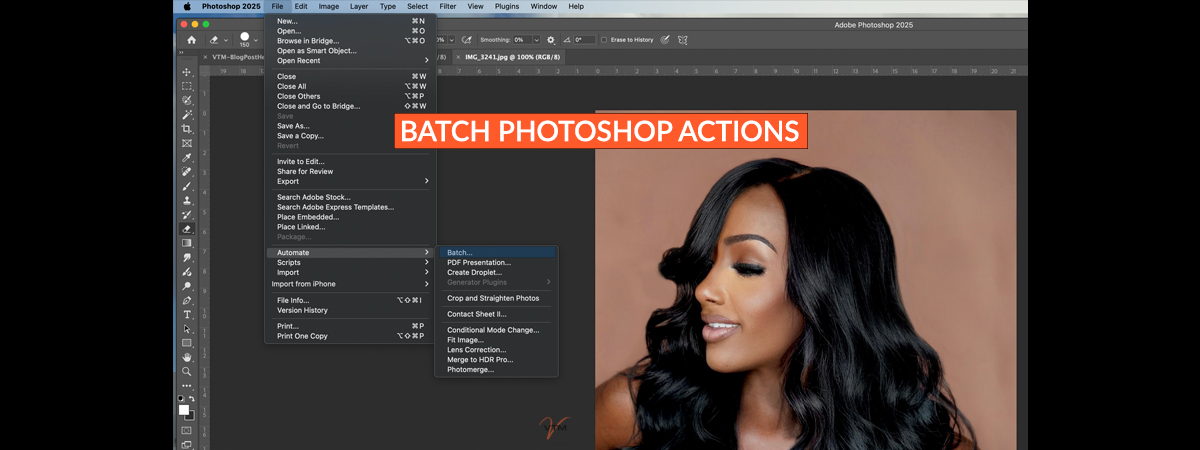
- Go to “File” > “Automate” > “Batch.”
- In the Batch dialog box:
- Select your “Batch Watermark” action from the “Action” dropdown menu.
- Choose the source folder containing your images.
- Choose the destination folder for your watermarked images.
- Adjust the “File Naming” options as needed.
- Click “OK.”
Fine-Tune Your Action:
- If needed, edit your action to adjust watermark positioning, opacity, or file saving options.
- Experiment with different watermark sizes and positions to find the optimal settings for your images.
Integrate into Your Workflow:
- Incorporate batch watermarking into your regular image processing workflow.
- Use it to watermark images for social media, your website, or client deliverables.
Consider Action Variations:
- Create multiple actions for different image sizes or orientations.
- Create different actions for different watermark opacity levels.
Bonus Tips
- Subtlety is Key: Avoid overly large or intrusive watermarks that detract from your images.
- Placement Matters: Position your watermark in a way that protects your image without obstructing the main subject.
- Opacity Control: Adjust the opacity of your watermark to create a subtle yet effective deterrent.
- Consistent Branding: Use the same watermark across all your images to maintain brand consistency.
- File Format Considerations: Choose a file format that balances image quality and file size.
By mastering Photoshop’s batch watermark action, you can efficiently protect your visual content, reinforce your brand identity, and streamline your workflow. Take control of your images and establish a professional presence across all your online platforms.
Did you find this post helpful?
If so, please consider subscribing to our newsletter, and receive more content like this directly to your inbox.
Click Here to Subscribe